Integrations
Code examples and/or tutorials for integrating your bot with various third party services.
Chat Widget Browser Integration
You can easily install a Pandorabots chat widget for your bot on your website by adding a simple code snippet to your webpage. This chat widget is very similar to the training widget that is on your Pandorabots dashboard for training your bot.
Setup
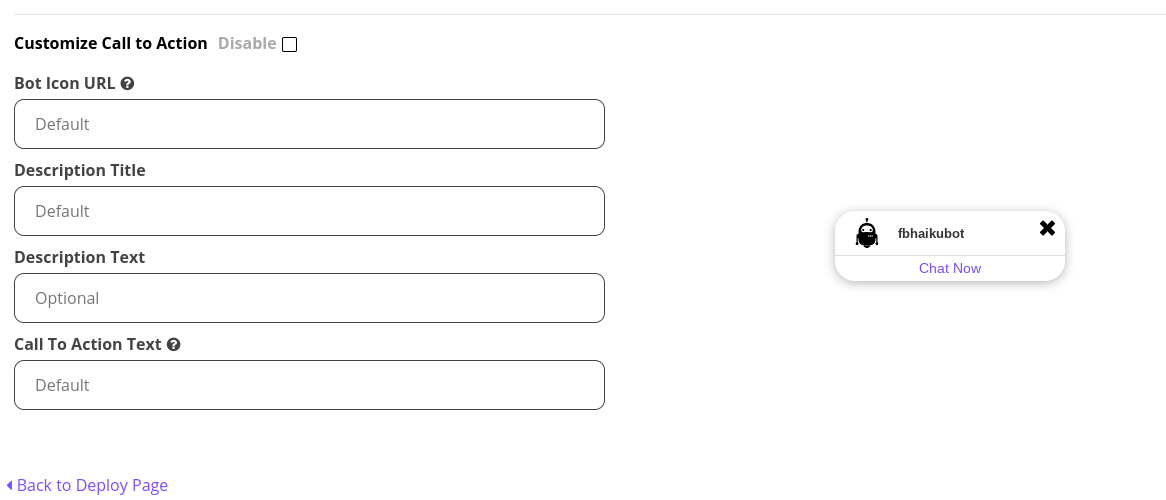
Open your Pandorabots dashboard and expand the chatbot you wish to use. Click on the Deploy option to get started. This will display all the different channels and platforms you can use to connect your chatbot. Select the Set Up button next to the Pandorabots Chat Widget (if this option is not available, you will have to either upgrade your plan and/or publish your bot to production). You will be able to see all of options for you to customize your chat widget, such as Title, Subtitle, color themes, Call to Action configuration etc.
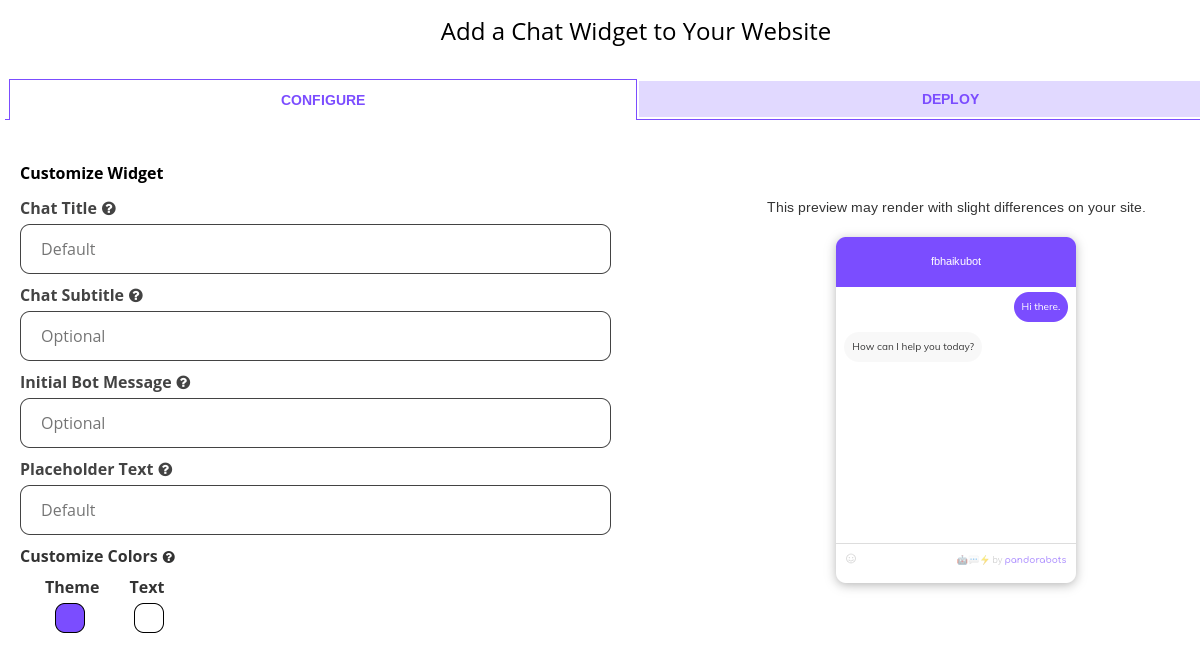
After you complete customizing your chat widget, go to the Deploy tab to view and copy the Javascript code snippet to add to the bottom of the body of your HTML page.
Updates
You can always return to this form to make changes to your chat widget snippet, or you can make a change directly to the code snippet already added to your webpage. Note that if you regenerate your user_key, you will have to make the necessary update to your webpage with a new PB_BOTKEY value or else the chat widget will not display on your page.
End-user Logs
The Chat Widget will generate unqiue end user client names starting with ‘cw’ that is valid during an active browser session. Note that these client names are not preserved once the browser is closed. You can review your chat widget logs by going to the Logs option on your bots menu. You can filter only Chat Widget logs (if your bot is deployed on multiple channels or to filter out your sandbox logs).
Tracking your bot’s conversations
In this week’s tutorial, we’ll be revisiting Firebase, this time as a way to store the conversations that users are having with a chatbot. We’ll be using jQuery and Twitter Bootstrap to create a responsive, real time interface that will also allow you to track conversations as they are happening.
The code
In our previous post on Bot Possession, we explored Firebase as a tool to generate different types of events that would cause our interfaces to respond in different ways. In this post, we’ll be using it more like a traditional database, with the added benefit of a responsive interface to track new conversations in real time.
Setup
You can grab the source code for this tutorial from its repository on Github:
$ git clone https://github.com/pandorabots/pb-logs-firebase.git
$ cd pb-logs-firebase
We’ll be using the command line utility Bower to manage our dependencies (Bower requires node.js, npm, and Git):
$ npm install -g bower
$ bower install
If you haven’t already, create an account on Firebase along with a new application. Grab the URL of the application and insert it into both js/user.js and js/log.js as the root variable:
...
var root = "https://your-firebase.firebaseio.com/";
...
You’ll also need to include your Pandorabots API credentials in js/user.js:
...
var pb = new Pandorabot("aiaas.pandorabots.com", APP_ID, BOTNAME, USER_KEY);
...
Because the Pandorabots web client requires cookies, you’ll have to either enable file cookies in your browser, or host the files on a server.
Chat interface

The chat interface is very similar to the one we used in the Bot Possession tutorial, however, our Javascript is handling each interaction a bit differently. We’re relying heavily on the sessionid that Pandorabots uses to identify conversations. If no sessionid is passed in the the Talk API, then Pandorabots will return one in the response that can be passed in to subsequent requests.
The sessionid is distinct from the client_name used to identify your users. While each user has a single unique client_name, they may have many different sessions (implying that they have had multiple conversations with the same bot).
Talk logs page

This page will display new conversations as they are initialized when end users open a new chat interface. Each row of the table represents a new conversation, identified by a timestamp, client_name, and sessionid. Clicking on a sessionid will open a modal dialog with the contents of that conversation.

Because we have attached event listeners for each individual conversation, new interactions will be displayed in the modal as they arrive.
Back to Firebase
While this interface provides a clean, simple way for you to track your bot’s talk logs, you can actually export your entire Firebase as JSON data for further use and analysis. The data structure we’ve constructed here makes it very easy to work with. Here’s the JSON extracted for the above conversation:
{
  "8229" : {
    "client_name" : "297014",
    "conversation" : {
      "-Ja_arxLSeKakX6QhSuX" : {
        "client_name" : "297014",
        "date" : "Wed Nov 12 2014 12:04:31 GMT-0800 (PST)",
        "input" : "Hello",
        "response" : [ "Hi it's great to see you!" ],
        "that" : ""
      },
      "-Ja_iNPY2TM14Z_N246U" : {
        "client_name" : "297014",
        "date" : "Wed Nov 12 2014 12:37:19 GMT-0800 (PST)",
        "input" : "How are you?",
        "response" : [ "I'm very well. How are you doing?" ],
        "that" : "Hi it's great to see you!"
      }
    },
    "date" : "Wed Nov 12 2014 12:04:31 GMT-0800 (PST)"
  }
}
Both the session and each individual interaction have a date and client_name for ease of use.
Talk logs and Zipf’s Law
The importance of your bot’s talk logs in the bot development process goes back to a statistical trend named after American linguist George Kingsley Zipf. Zipf’s law explains how the frequency of certain words in natural languages relate to each other:
Zipf’s law states that given some corpus of natural language utterances, the frequency of any word is inversely proportional to its rank in the frequency table. Thus the most frequent word will occur approximately twice as often as the second most frequent word, three times as often as the third most frequent word, etc.
- [Wikipedia](http://en.wikipedia.org/wiki/Zipf’s_law){:target=”_blank”}
Dr. Richard Wallace, the creator of Alicebot and inventor of AIML, discerned that this applied not only to individual words, but to phrases as well. This distribution pattern led to a key insight in chatbot development. By writing patterns and content to capture only the most common inputs being used, the developer could actually account for the majority of potential inputs.
Specifically, 1800 words cover 95% of all the first words input to ALICE.
(Note that the Rosie Framework is a product of this invaluable conversational data, designed to save developers from hacking away by blindly guessing what end-users might say.)
By keeping a close eye on your talk logs, you can gather similar data about your own bot. This will provide insight about the inputs that are the most important for your bot to understand given the context and domain in which your bot is being used. Keep in mind that the best bots are often domain specific – and that designing a bot to be an expert on a particular topic or domain leads to a far higher rate of successful interactions. Once you’ve implemented the conversation tracking features outlined in this tutorial, you can start collecting the data needed to run your own Zipf’s analysis and truly make your bot a master of its own domain.
Using Data Dynamically
Say you work in an industry like healthcare or financial services that typically deals with the treatment of “sensitive” end-user data. You want to build a conversational interface for your application, but you have concerns about using cloud services that might involve sending sensitive end-user inputs to third party services like Pandorabots for processing.
As a matter of policy, you may not send Pandorabots confidential information and, according to our Terms of Service, you must ensure that you take proper steps to obtain rights to send any end-user data to our service. Fortunately, there’s a simple solution for platform users in sensitive verticals to avoid sending sensitive information to Pandorabots’ servers.
In the example below, we’ll explore how to use Pandorabots as the dialog engine for your application, without sending inputs containing personal health info (PHI) to your chatbot.
Let’s say you are building a senior care application designed to remind someone when to take their medicine. To build such an application, you may need confidential information about your end-users’ prescriptions (and permission from the end-user to access this data; if you’re unsure if you have permission or how to get it, you should seek legal advice).
You may think your chatbot needs “know” this information to have a meaningful conversation with a user about their medication, but actually, any sensitive data can be dynamically inserted into the bot’s response by your application after it has returned an answer. This allows you to use Pandorabots without exposing sensitive data to our system, which is not HIPAA compliant.
Example
Mary Sue is using your application for the first time. When she logs in, your application will issue a call to Pandorabots that generates a client_name (see below) for Mary Sue so that the bot can maintain the state of her conversation.
When Mary Sue asks: “What medication do I need to take today?” your application will make a request to the bot on her behalf, sending the message with her pseudonymous unique identifier:
{
  "question": "What medication do I need to take today?",
  "client_name": "aiaas-XXX-user-101"
}
You can use Pandorabots to parse the meaning of the question, and return an appropriate answer. But because this question involves some PHI, let’s use Pandorabots to generate a template of what the answer will look like. Here, we’ll use the mustache templating engine:
<category>
  <pattern>WHAT MEDICATION DO I NEED TO TAKE TODAY</pattern>
  <template>
    Here is your medication schedule: {{ user.schedule }}.
  </template>
</category>
Now, your application can look up Mary’s PHI in the database (indexed here by client_name), and render it in the bot’s response as needed:
# pseudocode
template = "Here is your medication schedule: {{ user.schedule }}."
user = database.getUser('aiaas-djf-user-101')
response = mustache.render(template, user)
Here is the conversation from Mary’s perspective:
Mary: What medication do I need to take today?
Bot: Here is your medication schedule: 1 325mg aspirin daily.
As you can see, Pandorabots is occupying the role of a “dialog engine” that provides pre-formatted responses that your application can render. These templates can be used to render any sort of information that your application accesses.
Now, say Mary Sue has another, general question about Aspirin. This isn’t confidential information, and it’s fine to code that data directly into your bot’s knowledge base:
Mary Sue: What is Aspirin?
Bot: Aspirin: a synthetic compound used medicinally to relieve mild or chronic pain and to reduce fever and inflammation.
<category>
  <pattern>WHAT IS ASPIRIN</pattern>
  <template>
    Aspirin: synthetic compound used medicinally to relieve mild or chronic pain and to reduce fever and inflammation.
  </template>
</category>
If you have the information elsewhere, such as in a database or via a third-party API, you can use the same template technique as the PHI example to insert the proper information:
<category>
  <pattern>WHAT IS ASPIRIN</pattern>
  <template>Aspirin: {{ drugs.aspirin }}</template>
</category>
Putting your bot on #Slack
The Hubot project headed by Github is a highly extensible bot application used to automate and simplify development tasks. Hubot acts as a member of a chatroom, reading and posting messages of its own.
Unlike your human teammates, however, Hubot is backed by a server, and can do things like retrieve information from a database or post a message when a particular build is finished. While some Hubot tasks might be automated, others can be performed in response to messages posted by other users in the chatroom:
some-member: @hubot how many users are logged in right now?
hubot: There are currently 70 logged in users.
In the above interaction, Hubot’s message was generated by a function that made a query for all logged in users. In a Hubot script, you could then define a “listener” that performs this query when Hubot reads a particular message.
hubot.respond('how many users are logged in right now?'), (msg) ->
  // perform the query
Wouldn’t it be great if Hubot could understand other forms of this type of question? That’s why we’ve written a script that allows you to talk to a Pandorabot via a Hubot. Now you can harness the NLP capabilities of AIML to reduce a large number of inputs to a single query. This allows you to create expressive listeners for Hubot that leverage the power of AIML pattern matching.
<category>
  <pattern>HOW MANY USERS # LOGGED IN #</pattern>
  <template><srai>CURRENT USER QUERY</srai></template>
</category>
Prerequisites
Today, we’ll set up a simple event listener for Hubot that forwards messages to Pandorabots, and returns the Pandorabot’s response.
You’ll need a few things in place before you can start with the integration:
- A Slack team and personal account. If you don’t already have this, Slack’s sign up procedure will guide you through the process.
- An account on Heroku. There are different payment plans, however, the free tier should be more than enough for your Hubot instance.
- The Heroku toolbelt, for which Heroku offers installers for OS X, Windows, and Ubuntu. This is a set of command line tools that allow you to easily work with your applications deployed to Heroku.
- A deployed Pandorabot
- Node.js, for which there are installers for OS X and Windows, as well as the raw source.
Local setup
You’ll ultimately need to host Hubot on a server of some sort. Hubot comes packaged with some code to make it very easy to deploy to Heroku. Since Heroku does not offer a secure shell like Amazon or Google, you’ll be doing all your development locally before actually deploying your application.
Install Redis
Redis is an in-memory key-value cache and store that Hubot requires for persistant memory. For local development, you’ll need to install redis on your machine.
OS X:
$ brew install redis
Linux/Ubuntu:
$ sudo apt-get install redis-server
Unfortunately, Redis does not officially support windows, however, you can try using this port for Win64 created by MSOpenTech.
Create a new Hubot instance
There is a Yeoman generator that allows you to scaffold new Hubot projects.
$ npm install -g yo generator-hubot
By running the yo command, you can tell Yeoman you’d like to create a new Hubot project.:
$ mkdir mybot
$ cd mybot
mybot$ yo hubot
This will prompt you to answer a few questions about your bot. When prompted for the “Bot adapter” override the default selection by entering slack.
Once the prompts have completed, you should see that Yeoman has created a number of files and folders. To make sure your bot has been properly configured, you can run the binary from inside the mybot directory:
mybot$ bin/hubot
...
mybot> hubot ping
PONG
The command will print out some information about your instance of Hubot, and then present the Hubot shell adapter, which is a chat like interface that allows you to talk to Hubot from the command line.
Install Pandorabots script
Hubot operates on user-defined “scripts”, which tell Hubot to perform tasks when certain commands are issued to it. We have provided a script that allows you to forward inputs to Hubot to your Pandorabot. You can install the script using npm, along with a few dependencies:
mybot$ npm install --save pb-hubot
You’ll also want to add the Pandorabots script to the array in external-scripts.json:
[
  "pb-hubot",
  ...
]
In many of our other tutorials, we’ve stored Pandorabots API credentials in JSON files or as variables. But for our use on a server, we’re actually just going to set these as environment variables for Hubot to search for. Grab your app_id and user_key from the Developer Portal, and pick out one of your already deployed bot names. Make sure you are in the mybot directory (NOTE: this command works for setting environment variables supported in Linux/OS X but not Windows):
mybot$ export app_id=**********
mybot$ export user_key=********
mybot$ export botname=*********
Test
You are now ready to test your Pandorabot enabled Hubot from the shell interface. Run the binary, and try saying something to Hubot that you’ve programmed your Pandorabot to understand. Note that in the current implementation you must enter the pb prefix so Hubot knows to route the input to Pandorabots:
mybot$ bin/hubot
...
mybot> hubot pb hello
Hi there!
This response is just an example; your bot may have different responses depending on what categories it contains, and you can program your bot to know anything from company inside jokes to FAQs, etc.
Deploy to Heroku
Now that you’ve successfully configured Hubot to use the Pandorabots adapter along with one of your bots on chatbots.io, it is time to deploy Hubot to Heroku so that it may run continuously.
Heroku CLI
If you’ve signed up for a Heroku account and have the Heroku Toolbelt installed, you can login from the command line:
$ heroku login
You’ll be prompted for your credentials, and if the authentication succeeds, you’ll be able to make requests to Heroku without having to re-enter your information later.
Setup Heroku app
Heroku uses git for deployment. In other words, you can create a local repository and deploy your changes to Heroku using git push. From inside the mybot directory:
mybot$ git init
mybot$ git add .
mybot$ git commit -m 'first commit'
You can now initialize a Heroku app:
mybot$ heroku create
Configuring Heroku
Because of the Hubot’s Redis dependency, you’ll need some instance of Redis running online for your Heroku application to connect to. Heroku offers easy setup with RedisToGo, a database-as-a-service that has a free plan to get you started:
mybot$ heroku addons:add redistogo:nano
You’ll also need to redefine your environment variables on Heroku:
mybot$ heroku config:set app_id=$app_id
mybot$ heroku config:set user_key=$user_key
mybot$ heroku config:set botname=$botname
To hook Hubot up with your Slack chatroom, you’re going to need an API token from Slack. From the Integrations page on Slack, add a new Hubot integration, copy the API token, and set it as an environment variable on Heroku:
mybot$ heroku config:set HUBOT_SLACK_TOKEN=xoxb-1234567890-XXXXXXXXXXXXXXXXXXX
Finally, let’s add one more environment variable to Heroku so that our Hubot never goes to sleep. First, get your application’s URL by running heroku apps:info, then:
mybot$ heroku config:set HUBOT_HEROKU_KEEPALIVE_URL=xxx-yyyy.herokuapp.com
Push and test with Slack
You are now ready to deploy your Hubot to Heroku. This is as easy as:
mybot$ git push heroku master
And that’s it! If you visit your team’s Slack page, you should see that your bot has been added as a member. Try talking to the bot in the #general channel (Hubot uses this by default).
you: mybot pb hello!
mybot: Hi there!
Next Steps
You now have a fully functioning version of your bot deployed to a chatroom, able to converse with other members.
This is, however, just the beginning. As a next step, you might experiment with using <oob> tags in your bot’s response to actually provide further commands to Hubot. By combining the programmatic capabilities of Hubot and the conversational AI and NLP features of Pandorabots, you can create a variety of awesome chatbot applications… like an app for querying a database in natural language.
Stay tuned, and happy Hubotting!